Game character workflow
How to Sculpt Clothing Folds in Blender & ZBrush: A Game-Ready Workflow
To sculpt believable clothing folds, map the forces first, build the large silhouette-changing folds second, and leave seams and fabric texture until the end. The same order works in Blender and ZBrush—and it produces a cleaner high-poly sculpt for retopology and baking.
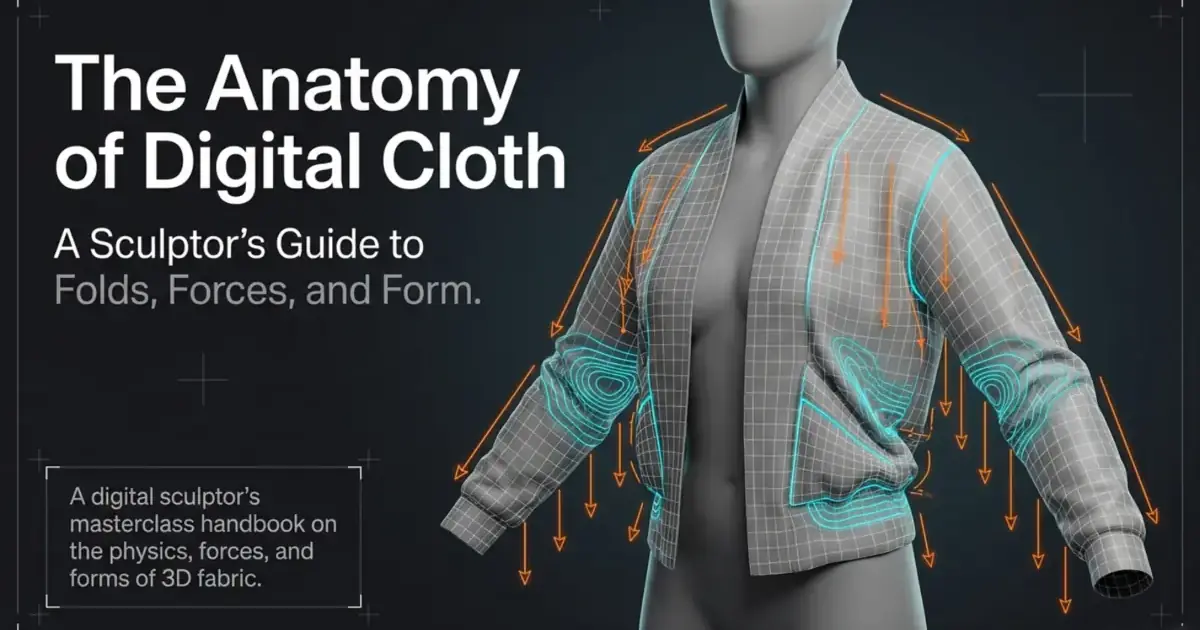
Random creases make cloth look carved. Convincing folds describe where the garment is anchored, where it stretches, where it compresses, how gravity pulls it, and how stiff the material is. This guide turns those physical causes into a repeatable production process for real-time characters.
Contents
Understand the anatomy of a clothing fold
A fold is the visible record of force moving through a thin material. The fabric cannot compress like clay, so excess length escapes into peaks and valleys. A useful fold has four readable parts:
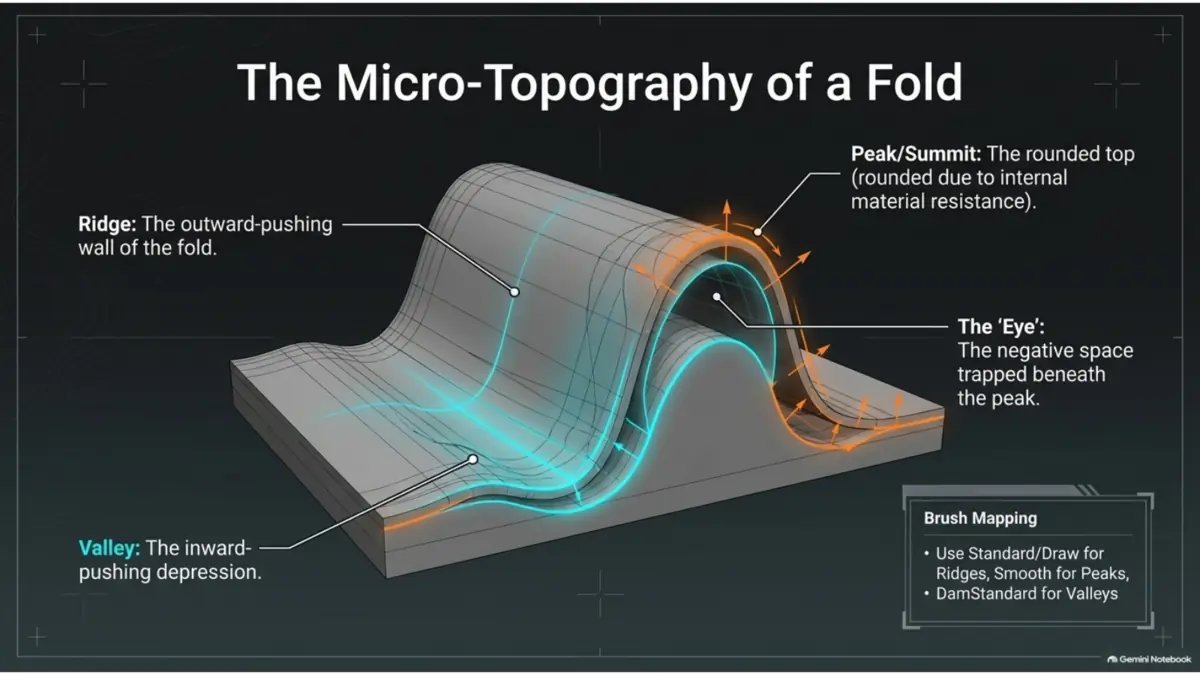
In practice, sculpt the volume before carving the line. If you draw a deep crease first, the surface often looks engraved. Build a soft ridge with Clay Strips, Inflate or a fold brush, establish the opposing plane, and only then define the valley with Draw Sharp or DamStandard.
Map tension, compression, anchor points and gravity
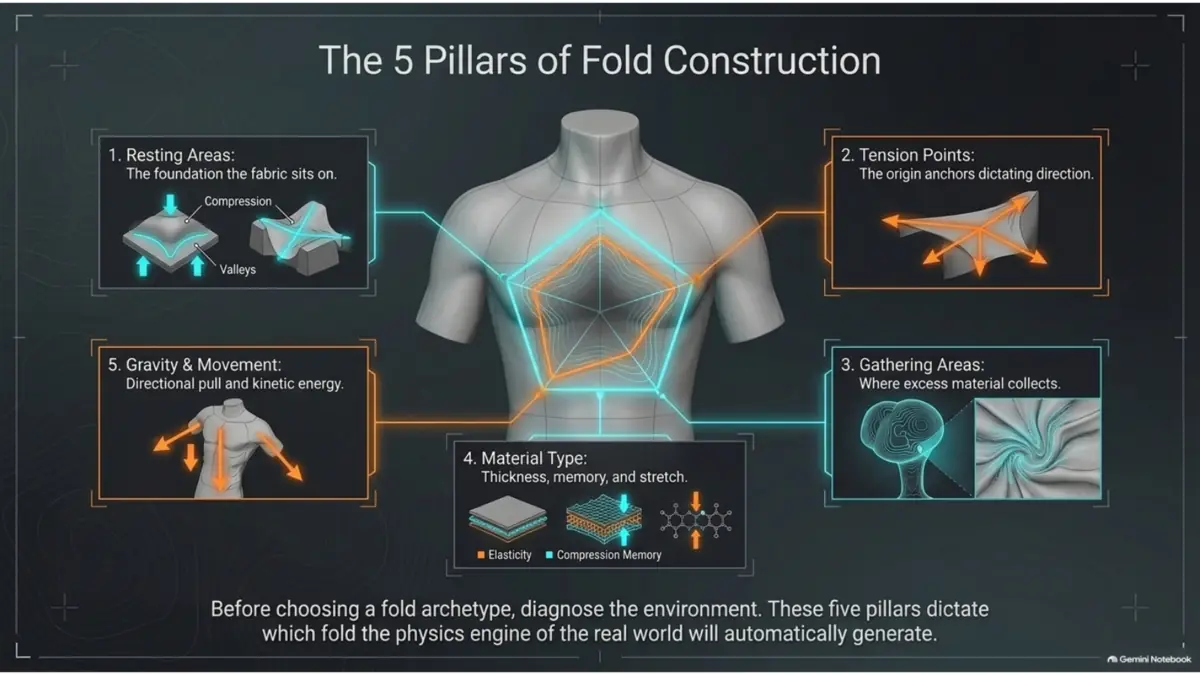
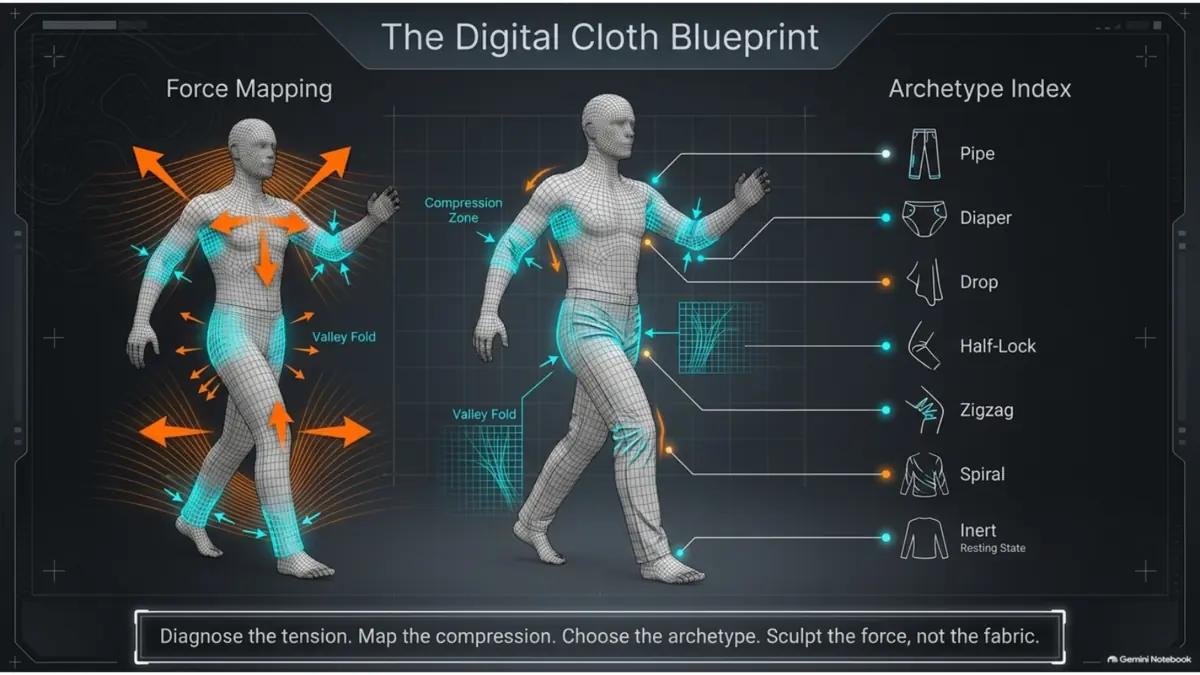
Before touching the mesh, mark four things on your reference: anchor points, tension zones, compression zones and gravity. This force map tells you which fold families belong on the garment.
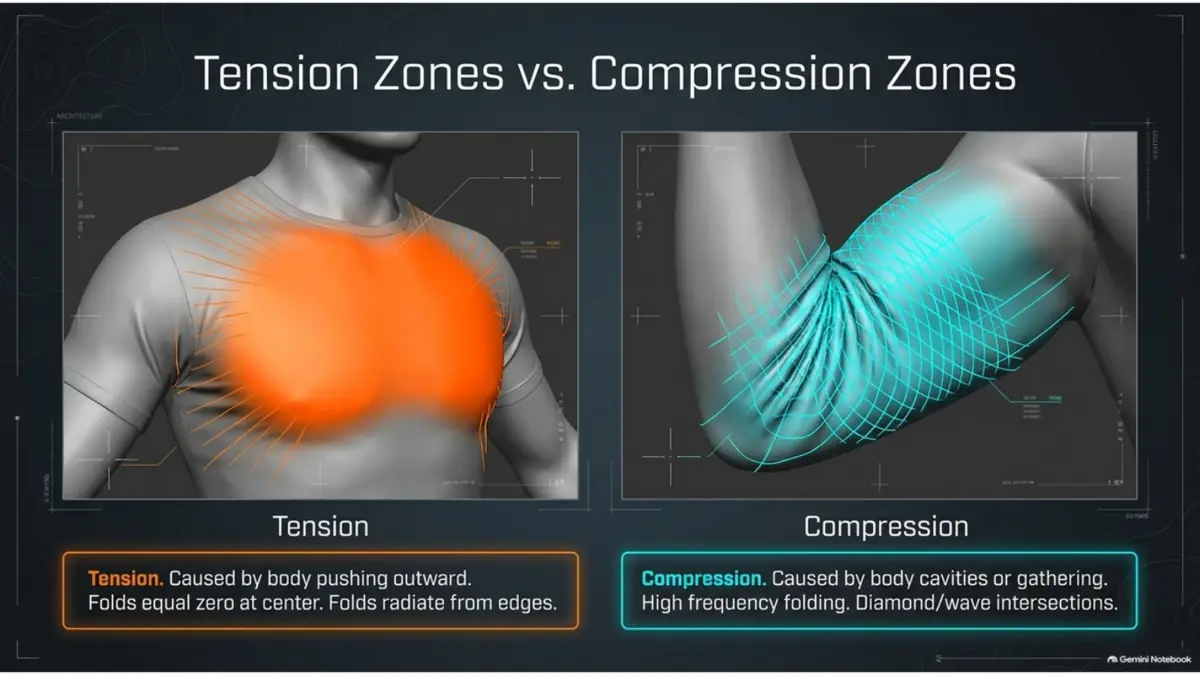
Tension zones form where the body or garment construction pulls the fabric outward—across the chest, shoulder, knee, seat or a fastened button. The tightest contact area is often comparatively smooth. Folds radiate from its edges toward another anchor or a looser region.
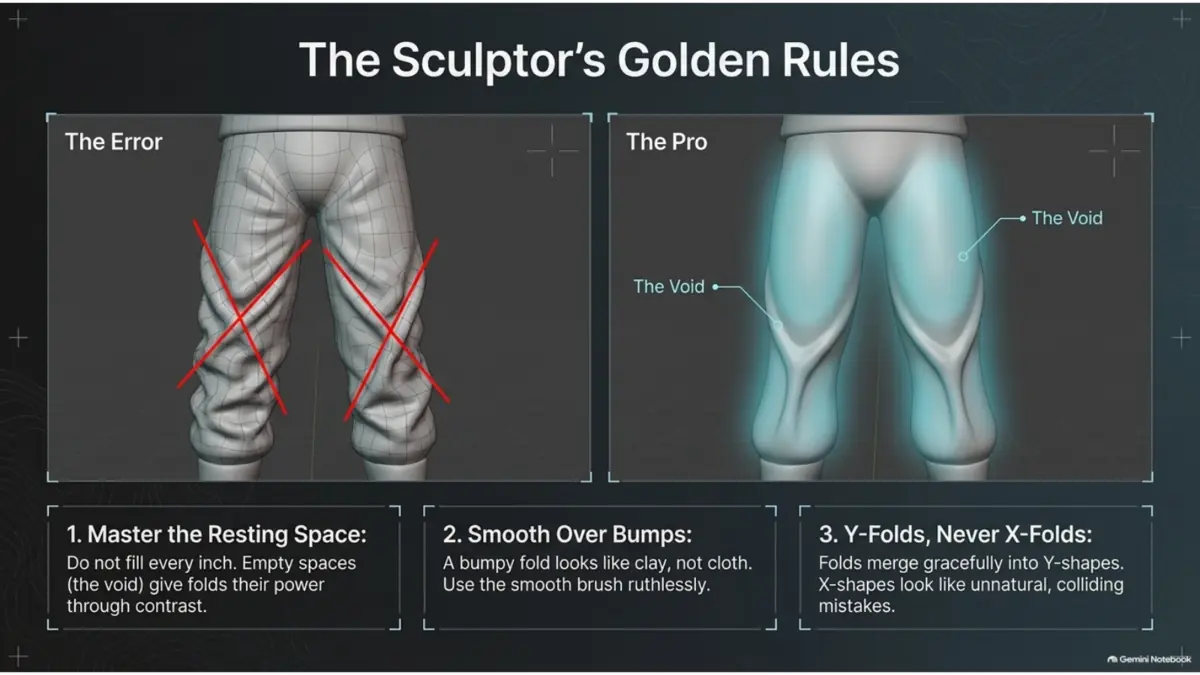
Compression zones form where material is pushed together—inside a bent elbow, behind a knee, under a belt or above a boot. Multiple force directions collide here, creating overlapping diamonds, hexagons and zigzags. Do not fill the whole garment with this density; compression needs calm areas around it to read.
The seven clothing fold types every sculptor should know
These archetypes are not decorative presets. Each one describes a different relationship between support, gravity and compression. Real clothing combines them, but naming the dominant fold helps you choose the correct structure.
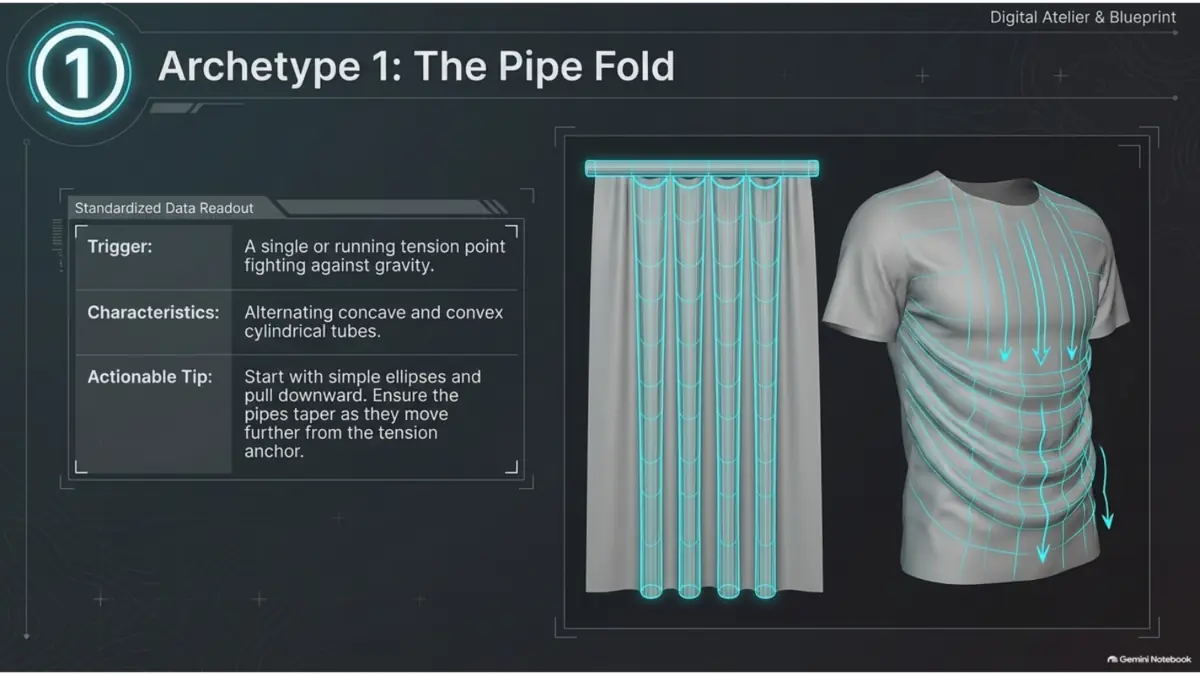
1. Pipe fold
Parallel, tube-like folds hanging from one support line. Use them on curtains, skirts, coat hems and loose sleeves. Vary the width and let the tubes widen or merge as they travel away from the anchor.
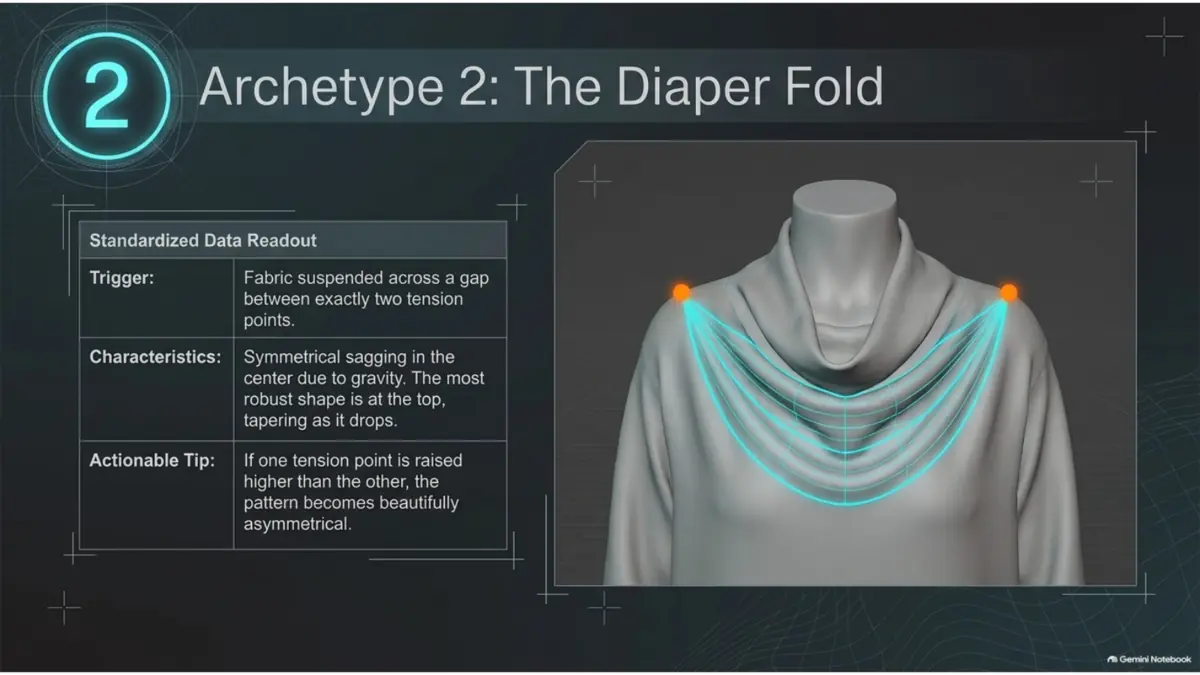
2. Diaper fold
A sagging U-shaped system suspended between two anchors. It appears on scarves, cowls and cloth stretched between shoulders. Keep the deepest arc below the anchors and introduce controlled asymmetry.
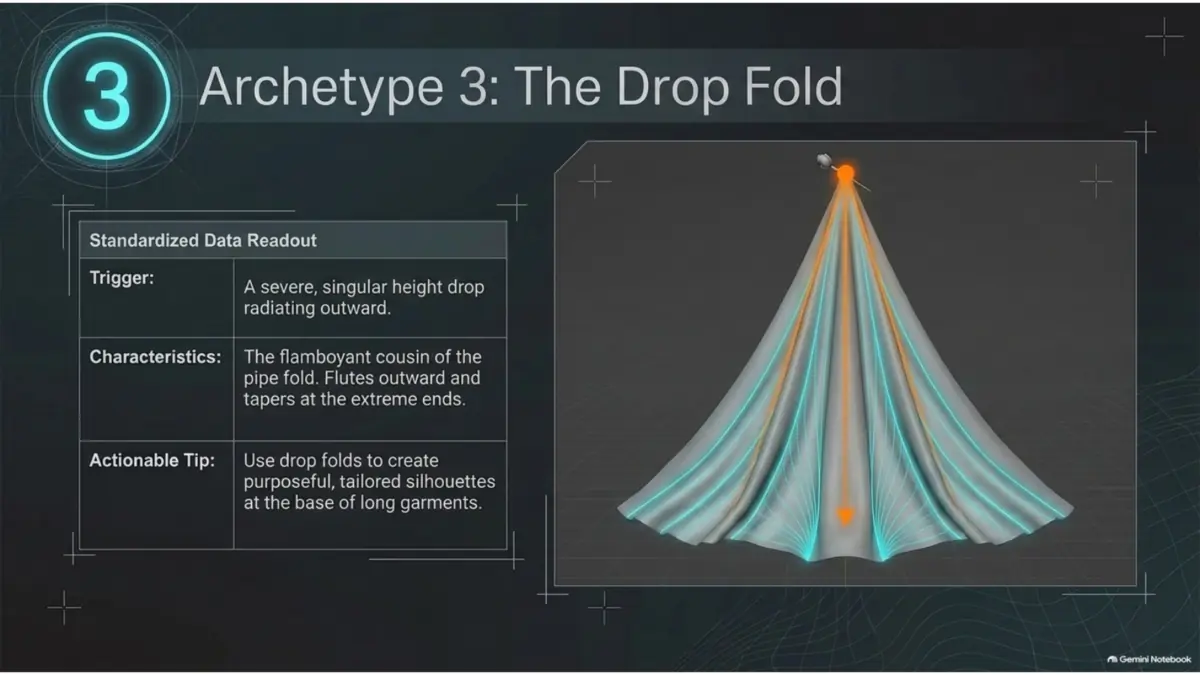
3. Drop fold
Folds radiate from one strong, elevated anchor and fan outward as gravity pulls them down. Use this pattern where a cape, sash or drape is pinned at a single point.
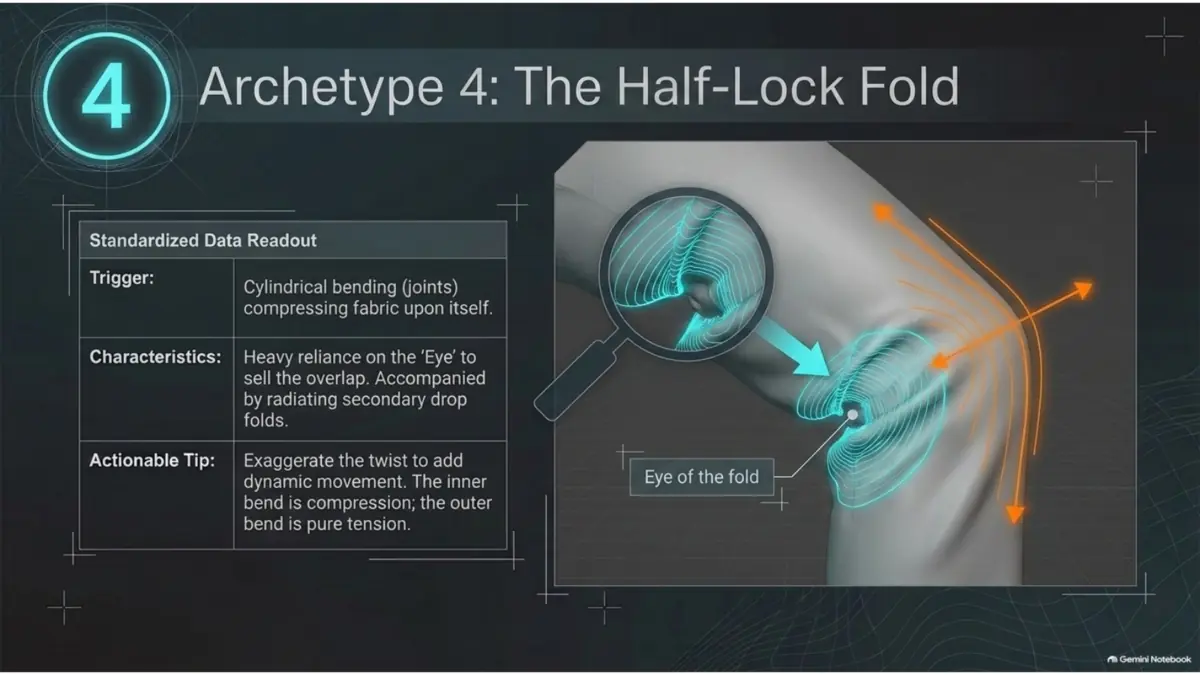
4. Half-lock fold
A cylindrical garment bends and one side collapses into a hooked lock. This is common around elbows and knees. Emphasize the eye, then soften the fold as it leaves the compression zone.
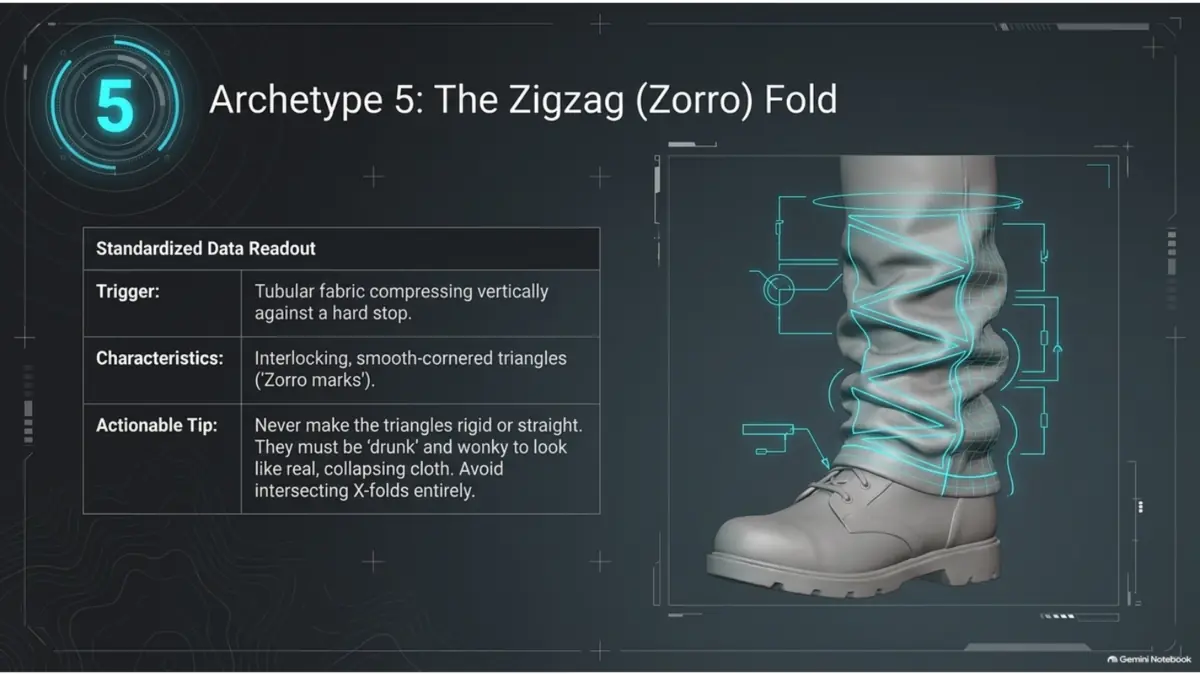
5. Zigzag fold
Alternating triangular turns produced by vertical compression around a limb. Think of interlocking, softened Z shapes rather than evenly spaced horizontal rings.
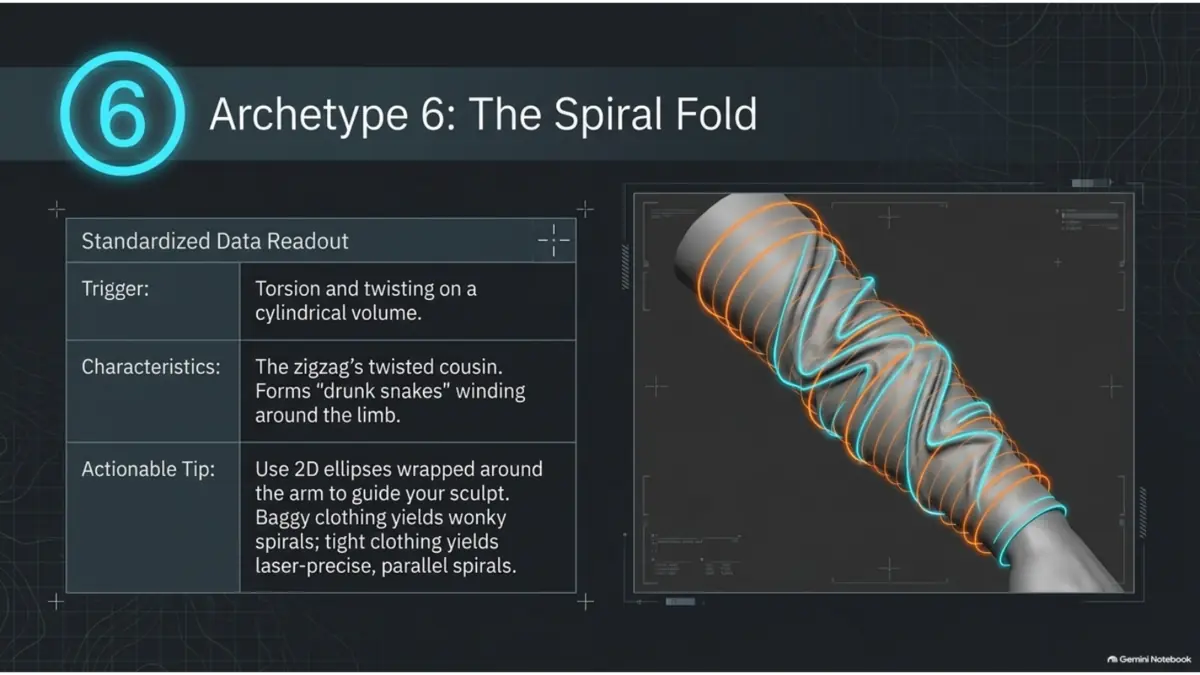
6. Spiral fold
A zigzag system influenced by twisting force. The folds wrap around the arm or leg in a helix. Break the rhythm before it becomes a perfectly repeated corkscrew.
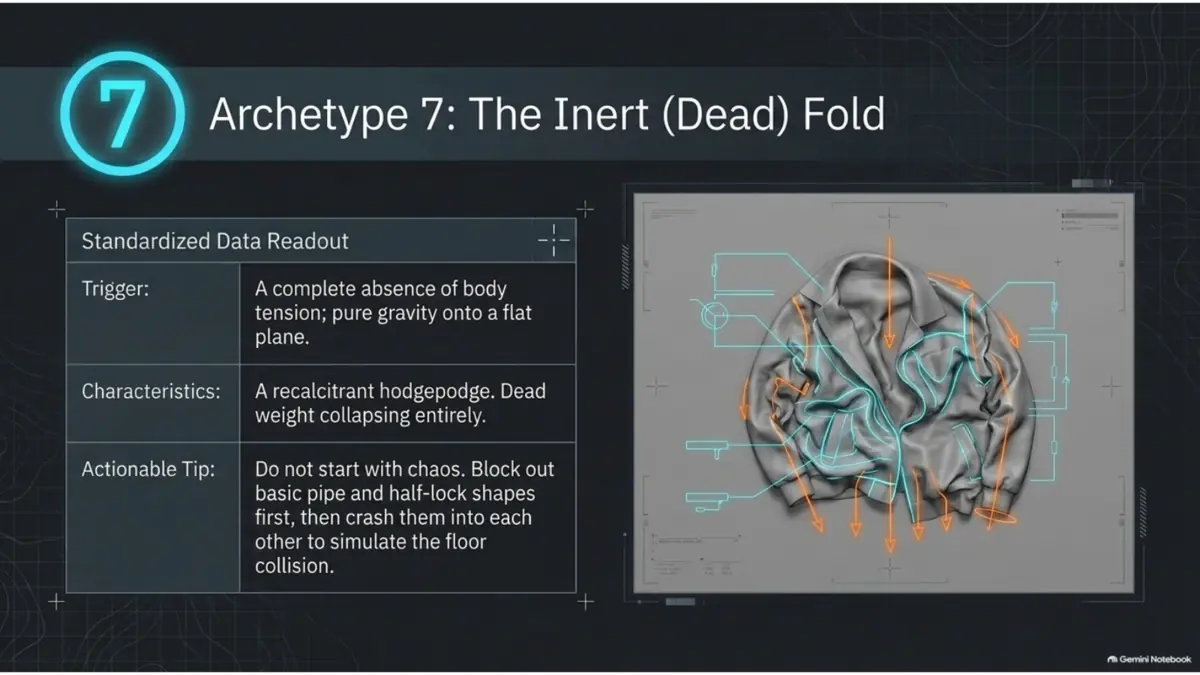
7. Inert fold
Unsupported fabric resting on the ground or another surface. It combines collapsed pipes, half-locks and broad flat resting areas. Treat the collision surface as the main design constraint.
Step-by-step clothing sculpting workflow
Build or extract a clean garment base
Start with a separate garment mesh. In Blender, duplicate the relevant body faces or use a masked extraction workflow, then push the cloth away from the anatomy and close problem areas such as the crotch and armpits. In ZBrush, mask the garment shape and use Extract, or begin from simple low-resolution topology.
Avoid a base that copies every anatomical hollow. Clothing bridges gaps and has thickness, so a shirt should not cling to every rib and a trouser crotch should not reproduce the body's topology.
Lock the silhouette and resting areas
Work at low resolution. Establish hem length, sleeve volume, waistband placement and the air gap between cloth and body. Reserve broad resting areas with little or no fold activity. At game camera distance, silhouette and large value changes matter more than small wrinkles.
Sculpt primary folds
Primary folds connect major anchors and change the outline. Use large brushes and inspect the model from several distances. Pipe, diaper and drop folds usually belong here. If the primary pass does not communicate weight in flat lighting, more detail will not save it.
Add secondary tension and compression
Introduce half-lock, zigzag and spiral structures around joints, belts and gathered areas. Build each fold as a volume, carve the valley lightly, then smooth the transition. Keep the highest density close to the force source and let folds decay as they travel away.
Break symmetry deliberately
Symmetry is useful during blockout, but final folds should reflect pose and construction. Keep the left and right sides consistent in fabric weight while changing the exact fold path, spacing and termination.
Add seams, stitches and surface texture last
Seams affect nearby cloth, so place them before the final micro pass and add slight puckering where construction pulls the panels together. Stitch rows and weave should support the garment scale; they should not overpower primary forms.
Blender clothing sculpting workflow
Blender gives you three useful ways to develop cloth, and they can be combined:
Voxel Remesh is useful during rough exploration, but it destroys clean topology and can fuse cloth to the body. If your garment is already close to production topology, preserve it with Multires instead. For a deeper comparison, see Dyntopo vs Voxel Remesh in Blender.
If you work mainly in Blender, the 90+ Blender Fabric Brushes provide Asset Browser-ready presets. The broader 170+ Fabric Fold Brushes are useful when you need a larger fold vocabulary across Blender and ZBrush.
ZBrush clothing sculpting workflow
ZBrush works best when you separate structure from polish. Keep a low-resolution duplicate for large corrections, use subdivision levels for staged detail, and store risky passes on Layers when possible.
For joint compression, use the 100+ Compression Fabric Folds Brushes as a secondary-form tool. For garment construction, add the 200+ Seams & Stitches Bundle only after the cloth volumes are stable.
Change the folds to match the fabric
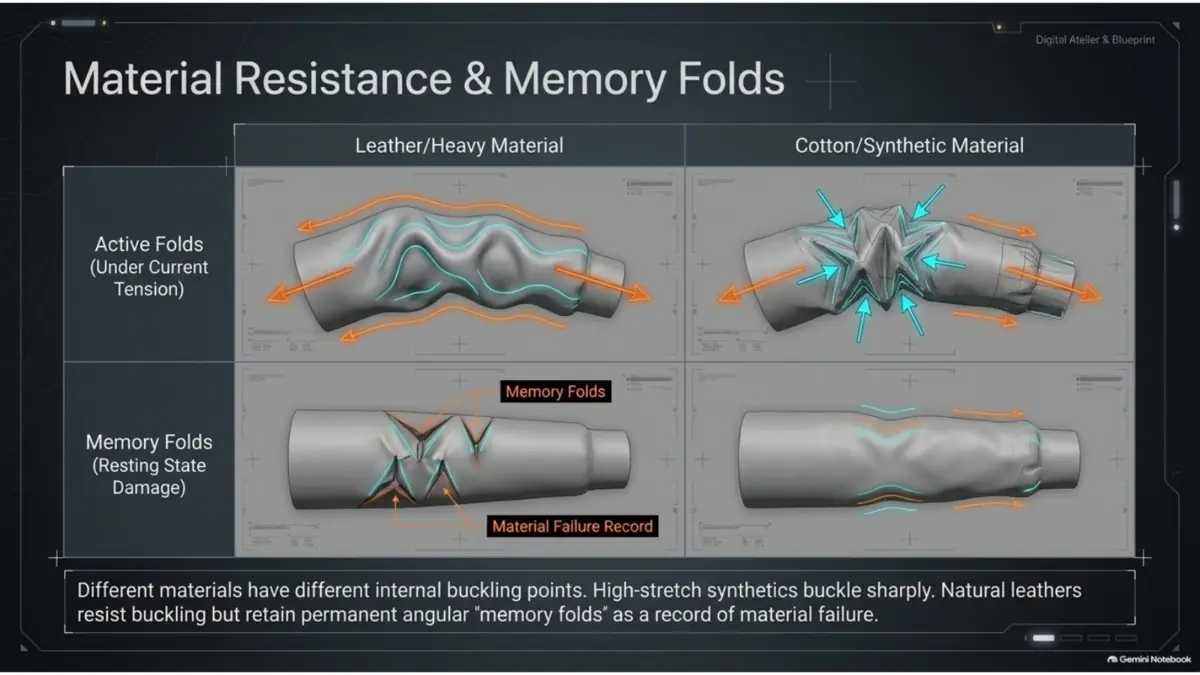
The force map may stay the same, but material resistance changes the frequency, radius and sharpness of the result.
| Material | Fold behavior | Sculpting choice |
|---|---|---|
| Leather / heavy wool | Broad arcs, fewer folds, stronger resistance | Use large radii, restrained valleys and clear plane changes |
| Denim / canvas | Firm angular breaks with visible memory | Use medium folds, pronounced seams and localized creasing |
| Cotton | Balanced soft and sharp folds | Mix broad primary forms with moderate compression detail |
| Silk / thin synthetic | Many narrow folds and rapid direction changes | Use smaller radii but preserve large resting areas |
Memory folds are residual creases left by repeated bending, wear or material damage. Add them after the active pose-driven folds. For a fast ZBrush detail pass, use 20 Memory Fold Alphas at low intensity and vary rotation and scale.
Manual sculpting vs Marvelous Designer
Marvelous Designer is excellent for garment construction, pattern-based fit and an initial physically plausible drape. Manual sculpting is better for art direction, stylization, silhouette cleanup and controlling which folds survive at game camera distance.
A strong hybrid process is: simulate the garment, export a clean high-resolution version, remove simulation noise, rebuild the primary fold hierarchy, add seams and memory folds, then create the production low-poly. If the design is simple or stylized, manual modeling and sculpting can be faster than preparing a simulation.
Turn the cloth sculpt into a game-ready asset
The game-ready stage is not just polygon reduction. The low-poly mesh must preserve the silhouette, deform around joints, carry efficient UVs and receive the high-poly information without bake artifacts.
- Duplicate and protect the high-poly. Keep a frozen version before retopology or projection.
- Retopologize for deformation. Put loops around shoulders, elbows, hips and knees. Follow garment construction where it also supports bending, but do not trace every sculpted wrinkle with topology.
- Keep silhouette folds in geometry. A fold that changes the outline cannot be recreated by a tangent-space normal map.
- Control thickness. Model visible hems, cuffs and open edges. Avoid an unnecessary double shell across the entire garment when the inside is never seen.
- Create UVs before the final bake. Place seams where they are hidden or where the real garment already has a construction seam. Give close-up areas enough texel density.
- Bake in stages. Bake the normal map and ambient occlusion, inspect seams and ray misses, then correct the cage or projection distance. Triangulate consistently before the final engine bake when your pipeline requires it.
- Test deformation in pose. A clean T-pose bake is not enough. Bend the elbows, knees and hips and check whether compression folds fight the skinning.
In Blender, Multires can bake differences between subdivision levels. In ZBrush, ZRemesher can create a new base and Project All can transfer detail, but hero-character clothing often benefits from manual retopology where animation flow matters.
Common clothing sculpting mistakes
Clothing fold sculpting FAQ
Should I sculpt clothing folds manually or use cloth simulation?
Use simulation to establish believable drape and manual sculpting to improve the silhouette, clarify tension, remove noise and art-direct the result. Manual sculpting is usually faster for stylized clothing and small corrections.
What are the main types of clothing folds?
The seven useful archetypes are pipe, diaper, drop, half-lock, zigzag, spiral and inert folds. Real garments usually combine several types rather than showing only one.
Which folds should I sculpt first?
Start with primary folds that change the silhouette and communicate weight. Add secondary compression and tension folds next, then seams, memory wrinkles and fabric texture.
How do I keep clothing folds from looking random?
Map the garment's anchor points, tension zones, compression zones and gravity direction before sculpting. Every major fold should connect to one of those causes.
How much detail should game-ready clothing have?
Keep silhouette-critical folds in geometry. Bake medium and small folds, seams and surface texture into normal maps when they do not need to deform or change the outline.
Can the same workflow be used in Blender and ZBrush?
Yes. The artistic order is the same in both programs: blockout, primary forms, secondary folds, construction detail, retopology, UVs and baking. Only the specific brushes and retopology tools change.